The PCV system is part of the engine’s crankcase ventilation design, which helps control internal pressure and emissions. For additional background, this overview explains PCV valve function and purpose. When it sticks open/closed or the hose collapses, you can get rough idle, oil leaks, increased oil consumption, or check-engine lights. This guide covers a typical PCV valve replacement workflow that applies to many vehicles, with notes where designs differ.
Safety note: Work on a cool engine. Keep loose clothing/hair away from belts and fans. If anything feels unclear, stop and consult a qualified technician.
Tools and supplies
Basic tools
- Gloves + safety glasses
- Flat screwdriver or trim tool (for clips)
- Needle-nose pliers (spring clamps)
- 1/4″ drive ratchet + small sockets (common sizes: 8mm, 10mm)
- Pick tool (helpful for stubborn hoses)
Supplies
- Correct replacement PCV valve (or PCV “assembly” if your vehicle uses one)
- New grommet or O-ring (recommended if the valve seals into a rubber grommet)
- Brake cleaner or throttle-body safe cleaner + shop towels (for light cleanup)
- Dielectric grease (optional, for electrical connectors if you unplug any)
Optional
- Torque wrench (low-range) if the PCV is part of a bolted housing
- OBD2 scanner (to clear codes / verify fuel trims)
Before you start: Identify which PCV design you have
Most vehicles fall into one of these:
- Valve pressed into a rubber grommet (often on the valve cover)
- Valve threaded into the valve cover or housing
- PCV integrated into a cover/plate/assembly (bolts + gasket)
- Modern “diaphragm” PCV integrated into the valve cover (may require replacing a cap, diaphragm kit, or entire valve cover depending on model)
If you’re unsure which you have, search your engine code + “PCV location,” or check the service manual.
Reference (general):
Symptoms checklist (helps confirm you’re solving the right problem)
Common signs of a failing PCV valve/system:
- Rough idle, stalling, or idle surge
- Whistling/hissing from the valve cover area (vacuum leak)
- Oil seepage from gaskets (excess crankcase pressure)
- Increased oil consumption
- Check engine light with lean codes (often P0171/P0174) or misfires
If your engine has heavy sludge buildup or extreme oil usage, a PCV valve alone may not fix the underlying cause—but it’s still a valid maintenance step.
Before beginning the replacement process, it’s important to understand how the PCV system affects engine operation. In most cases, a faulty PCV valve or hose causes idle issues and lean conditions. As a result, inspecting the system carefully before removal helps prevent misdiagnosis. Once the system is identified and access is confirmed, you can proceed with the step-by-step replacement process.
Step-by-step procedure
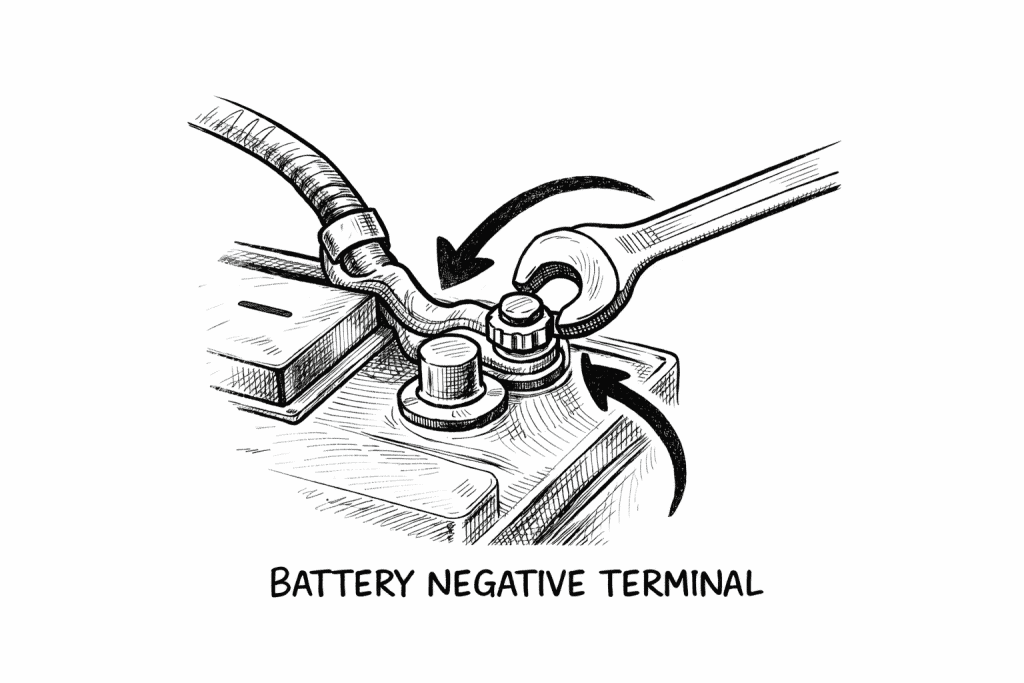
1) Confirm the engine is cool and disconnect the negative battery cable (optional)
- Battery disconnect is optional for a simple mechanical PCV, but recommended if you’ll remove intake components or unplug sensors.
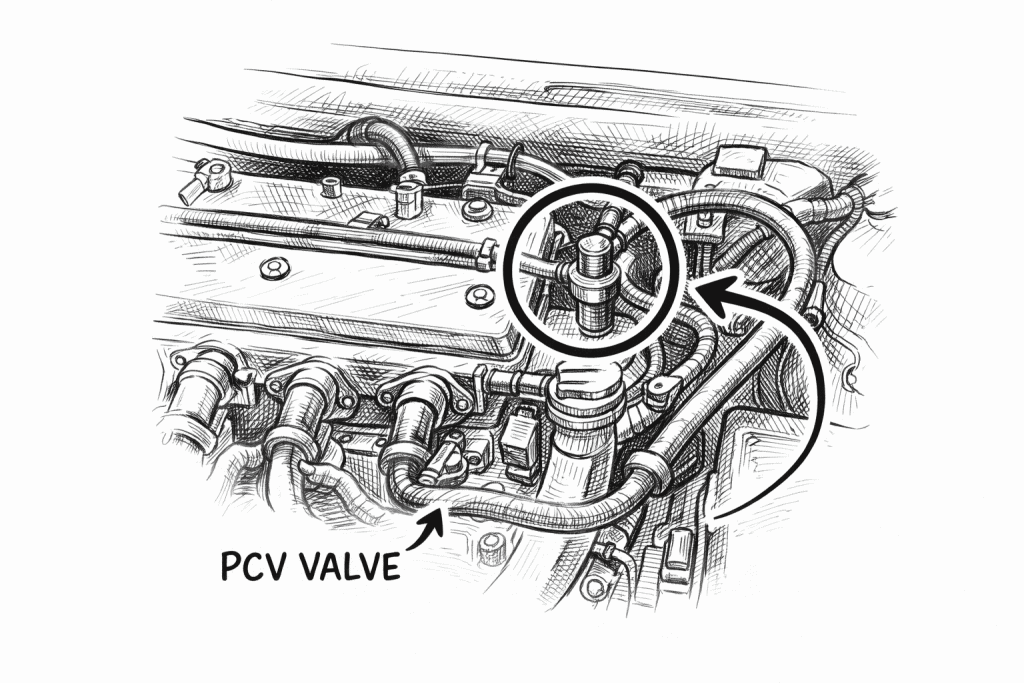
2) Locate the PCV valve and its hose routing
Common locations:
- On top of the valve cover (visible small valve + hose)
- Behind the intake manifold (hose disappears under the manifold)
- Integrated into a plastic PCV housing near the valve cover
Follow the hose: one end usually connects to the valve cover/PCV point and the other to the intake manifold or intake tube (depending on system design).
Tip: Take a quick phone photo before you remove anything. It prevents hose-routing mistakes.
At this stage, it’s also helpful to pause and confirm that all surrounding components are accessible. In many cases, taking a moment to review hose routing and connector placement helps prevent mistakes before moving forward.
3) Remove the engine cover or intake ducting (if needed)
- Pop off plastic engine covers (usually grommets or a few bolts)
- If the PCV is blocked by the intake tube, loosen the hose clamps and move the tube aside carefully
Avoid ripping small vacuum lines—they get brittle with age.
4) Disconnect the PCV hose/clamp
- There are a few clamp types:
- Spring clamp: squeeze with pliers, slide it back on the hose
- Worm clamp: loosen with screwdriver
- Quick-connect fitting: press tabs or release clip, then pull straight off
- Best practice: Twist the hose gently to break it free before pulling. Don’t yank.
- If it’s stuck: Use a pick tool to gently separate the hose from the nipple—don’t gouge the plastic.
5) Remove the old PCV valve (method depends on design)
A) PCV valve pressed into a grommet
- Grab the valve body and twist while pulling upward
- If the grommet is hard/cracked, remove it too
Important: A brittle grommet can crack and drop pieces into the valve cover opening. If it’s deteriorated, replace it.
B) PCV valve threaded in
- Use the correct wrench/socket
- Turn counterclockwise to remove
- Inspect threads and sealing surface
C) PCV in a bolted housing/plate
- Remove bolts evenly
- Lift housing carefully
- Replace gasket/O-ring as specified
6) Inspect and clean the sealing area (lightly)
- Wipe oil residue
- If there’s sludge buildup around the opening, clean the exterior only
- Don’t push debris into the valve cover
If you found heavy sludge, consider a more comprehensive maintenance plan (oil change interval verification, correct oil grade, etc.).
7) Check the hose and fittings (do not skip)
A “bad PCV” symptom is often caused by the hose, not the valve.
Inspect for:
- Cracks near the ends
- Soft/mushy spots (oil saturation)
- Collapsed sections
- Broken quick-connects
Replace damaged hoses/fittings now—vacuum leaks will cause lean codes and rough idle.
8) Install the new PCV valve
Press-in style
- If using a new grommet, seat the grommet first
- Push the valve in firmly until fully seated
- It should feel snug—no wobble
Threaded style
- Install any new O-ring if used
- Thread by hand first to avoid cross-threading
- Tighten to spec if available; otherwise snug (do not over-torque plastic housings)
Bolted housing/plate
- Install new gasket/O-ring
- Tighten bolts evenly in a criss-cross pattern
- Torque to spec if you have it (service manual recommended)
9) Reconnect hose(s) and reinstall removed parts
- Push hoses fully onto their fittings
- Reposition clamps exactly where they were (behind the raised barb)
- Reinstall intake ducting and engine cover
- Double check nothing is pinched or rubbing a belt
At this point, you can proceed with the next step once the area is clear and all components are visible.
10) Start the engine and verify operation
Let it idle for 2–3 minutes.
Check for:
- Hissing/whistling (vacuum leak)
- Rough idle (should improve if PCV was the issue)
- Oil seepage around the PCV area
- Check engine light behavior
Quick vacuum-leak check:
Lightly spray a small amount of cleaner around the PCV hose connection area (avoid hot exhaust). If idle changes, you may have a leak at a fitting.
11) Optional: Scan and clear codes, then verify fuel trims
If you had a check-engine light:
- Read codes
- Clear after repair
- Confirm the code does not return after a test drive
If your scanner shows fuel trims, a vacuum leak fix often improves trims toward normal.
Common mistakes that cause “it runs worse now”
- Not seating the hose fully (vacuum leak)
- Reusing a cracked grommet
- Breaking a quick-connect fitting
- Installing the wrong PCV part (very common—parts vary by engine)
- Over-tightening a plastic threaded PCV/housing
Test drive checklist (5–10 minutes)
- Normal idle at stops
- No new whistling noises
- Smooth acceleration (no hesitation)
- No fresh oil smells or seepage near the valve cover
Related Repairs & Tools
If you’re troubleshooting idle issues, lean conditions, or check engine lights, these related guides and tools may help:
After completing the installation, take a moment to review all connections and hose routing. In addition, verify that clamps and fittings are fully seated and secure. If everything appears correct, start the engine and allow it to idle. As a result, you should notice smoother operation and more stable idle behavior. Finally, perform a short test drive to confirm the repair was successful.
Disclaimer
This guide is for general educational information. Procedures vary by engine design. Always follow your vehicle’s service information and use appropriate safety practices. If you’re not comfortable performing the work, have it completed by a qualified technician.