Link to Cooling System Maintenance Overview (future hub or guide)
Checking your engine coolant level is one of the simplest yet most important maintenance tasks you can perform. When done regularly, it helps prevent overheating, protects internal engine components, and supports long-term reliability. Although the process is generally similar across vehicles, procedures vary by vehicle, so model-specific guidance should always be consulted when available.
Why Checking Coolant Level Matters
Engine coolant, also known as antifreeze, regulates operating temperature by absorbing and dissipating heat. Without enough coolant, heat builds rapidly, which can lead to warped components, blown head gaskets, or complete engine failure. Therefore, checking coolant level periodically is a proactive step that helps avoid costly repairs.
Additionally, monitoring coolant level can reveal early warning signs of leaks or system issues before they escalate.
Important Safety Notice
Always allow the engine to cool completely before checking coolant. Opening a hot cooling system can cause serious burns due to pressurized fluid and steam.
Note: Procedures vary by vehicle. Always follow your manufacturer’s service recommendations for your specific model.
Flashlight (optional, but helpful in low-light areas)
Manufacturer-approved coolant (only if topping up is necessary)
1. Park and Cool the Vehicle
First, park the vehicle on a level surface and turn the engine off. Next, allow the engine to cool for at least 30–60 minutes, depending on recent driving conditions.
This step is critical because coolant systems remain pressurized while hot.
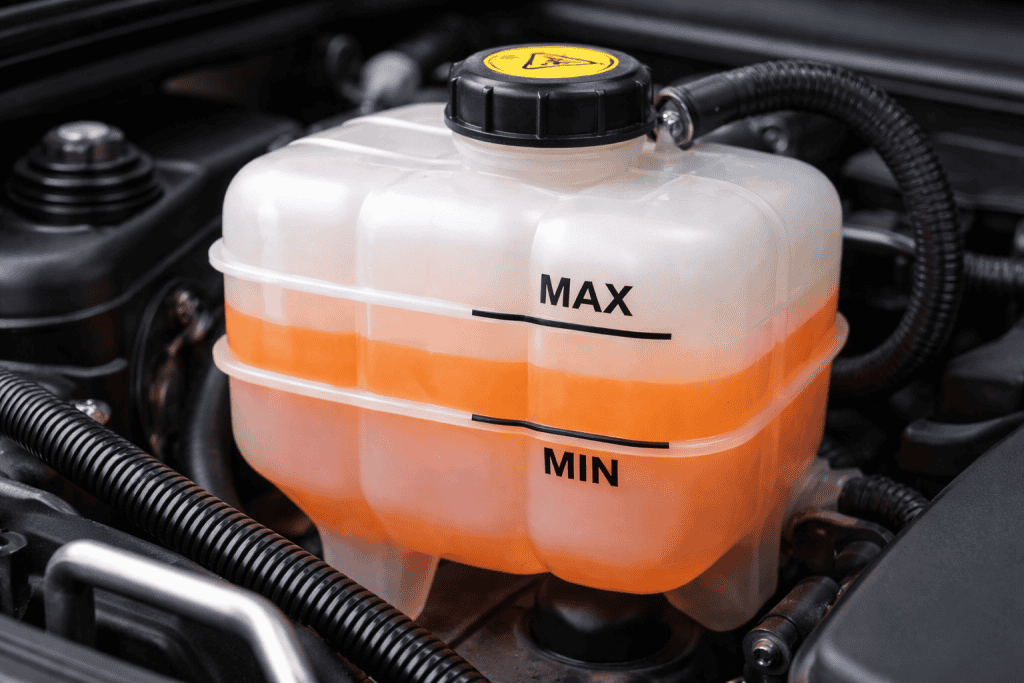
2. Locate the Coolant Reservoir
Most modern vehicles use a transparent plastic coolant reservoir located near the radiator.
Typically, it is marked with:
“Coolant”
“Engine Coolant”
A temperature or warning symbol
Because reservoir placement varies, checking the owner’s manual can save time.
3. Check the Coolant Level Markings
Once located, inspect the side of the reservoir. You should see “MIN” and “MAX” or “LOW” and “FULL” markings.
If the coolant level sits between the marks, it is within the normal range.
If the level is below the minimum, topping up may be required.
Importantly, you should not open the radiator cap unless the service manual specifically instructs you to do so.
4. Inspect Coolant Condition
While checking the level, also observe the coolant’s appearance.
Healthy coolant is usually:
Green, orange, pink, blue, or yellow (depending on type)
Clear and free of debris
However, cloudy, rusty, or oily coolant may indicate contamination or internal issues, which should be addressed promptly.
5. Top Up Only If Necessary
If coolant is below the recommended level, add the correct coolant type slowly to the reservoir until it reaches the proper mark.
Never mix incompatible coolant types. If you are unsure which coolant to use, consult the service manual or label under the hood.
Checking engine coolant level is a quick task that delivers long-term benefits. By staying consistent, you reduce the risk of overheating and extend engine life. Nevertheless, procedures vary by vehicle, so manufacturer guidance should always take priority.
[…] risk, a thorough pre-purchase car inspection should include extended driving at varying speeds and checking fluid condition before the engine warms fully. Ignoring early shift irregularities increases the chance of inheriting a major […]
This platform analyzes depreciation trends, resale value behavior, and long-term ownership costs, helping drivers understand how mileage, maintenance, and timing shape real financial outcomes.